Coil Cut
Switching
All diagrams are drawn based
on DiMarzio pickup wire colors.
| |
There's more than one way to wire a humbucking pickup. That is to say, a humbucking pickup can be wired with an alternative wiring and if done correctly, it will still be hum canceling
and will retain all of the sound characteristics of conventional wiring.
If that's the case, what's the point in even doing this?
The difference occurs whenever coil cut switching is chosen.
Coil cut switching was already discussed on page one but now we'll look at it
in much greater detail and possibly give you additional ideas about guitar wiring.
| |
SPST Coil Cut Switch
 One thing we never discussed is which coil gets cut and which coil stays active when a coil cut switch is 'on'.
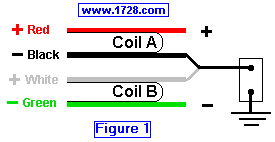
Figure 1 shows the simplest wiring for a coil cut switch.
When the switch is 'on', it 'grounds out' the middle
wires, which causes both of Coil B's wires (green and white) to be connected to each other.
This is, in effect, creating a shunt (a deliberate short circuit) across Coil B so that it can no longer
produce any sound.
One thing we never discussed is which coil gets cut and which coil stays active when a coil cut switch is 'on'.
Figure 1 shows the simplest wiring for a coil cut switch.
When the switch is 'on', it 'grounds out' the middle
wires, which causes both of Coil B's wires (green and white) to be connected to each other.
This is, in effect, creating a shunt (a deliberate short circuit) across Coil B so that it can no longer
produce any sound.
So, coil 'B' has been shunted and
Coil A is the active coil.
If we wanted Coil 'B' to be the active pickup, is there a way to do this? Sure.
"Inside-Out" Wiring of a Humbucker
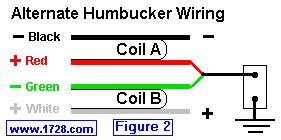 Figure 1 shows a conventional humbucker wiring - red to 'plus', black to 'minus' and the two
'middle' wires (black and white) connected to each other. Figure 2 shows an
alternate wiring. Speaking informally, you could say the red and the green wires are now
the 'middle wires' and what were the two 'middle wires' are now on the 'outside'. (I refer to this as
'inside out' wiring.) There is nothing wrong with this, it sounds exactly as it did before
and it is in phase with itself just as if it were wired conventionally.
Figure 1 shows a conventional humbucker wiring - red to 'plus', black to 'minus' and the two
'middle' wires (black and white) connected to each other. Figure 2 shows an
alternate wiring. Speaking informally, you could say the red and the green wires are now
the 'middle wires' and what were the two 'middle wires' are now on the 'outside'. (I refer to this as
'inside out' wiring.) There is nothing wrong with this, it sounds exactly as it did before
and it is in phase with itself just as if it were wired conventionally.
Now, when the coil cut switch is 'on', the red wire
is being led to ground, Coil A has been shunted and
Coil B is the active coil.
DPDT plus SPST Switch
 Using an SPST switch connected to the 'jumper' of a DPDT series/parallel switch works the same way as in the previous diagrams.
When the coil cut switch is 'on', a conventionally wired humbucker 'grounds out' the middle wires and Coil A is the active coil.
If the humbucker has an alternate (or 'inside-out') wiring, Coil B is then the active coil during coil cut.
SPDT Center OFF Switch
You can choose series humbucker / Coil A / Coil B all with one switch
 The diagram on the right offers an interesting, relatively easy-to-wire circuit that gives you three tone choices with just one switch.
Remember to use a single pole double throw center OFF switch. (This switch isn't particularly difficult to find but make sure you use this exact type of switch).
The diagram on the right offers an interesting, relatively easy-to-wire circuit that gives you three tone choices with just one switch.
Remember to use a single pole double throw center OFF switch. (This switch isn't particularly difficult to find but make sure you use this exact type of switch).
In the center position, the switch isn't connecting anything and so this produces the series wired humbucker tone.
When switched in one direction, the switch connects the red and black wires, which shunts Coil A and leaves Coil B active.
When switched in the other direction, the switch connects the white and green wires, which shunts Coil B and leaves Coil A active.
DPDT on/on/on Coil Cut Switch
 This type of switch utilizes a different manner of coil cut switching.
Looking at the graphic on the right, we see a very popular switching arrangement for a humbucking pickup.
It gives you the options of coils in series, coils in parallel or (what concerns us most in this topic) - just one coil active.
This type of switch utilizes a different manner of coil cut switching.
Looking at the graphic on the right, we see a very popular switching arrangement for a humbucking pickup.
It gives you the options of coils in series, coils in parallel or (what concerns us most in this topic) - just one coil active.
Looking very carefully at the graphic, there is a dashed blue line in the lower left and upper right part of
the switch. These are the terminals that are connected when the switch is in the middle ('coil cut')
position. Notice that in this case, the switch does not shunt the inactive coil but in fact shuts it off.
(Coil B's white wire has no connection to the output).
Following the current flow, we see that Coil A is the active coil.
 Now, if we want Coil B to be active, we'll have to give the humbucker an 'inside-out' wiring.
Compared to the last diagram, it's as though the green and red wires have been shifted 'up'
one terminal and the black and white have been shifted 'down'. Parallel and series settings
will sound exactly the same as the previous wiring. The
only difference is when the switch is set to the middle 'coil cut' position Coil B is the active coil.
Now, if we want Coil B to be active, we'll have to give the humbucker an 'inside-out' wiring.
Compared to the last diagram, it's as though the green and red wires have been shifted 'up'
one terminal and the black and white have been shifted 'down'. Parallel and series settings
will sound exactly the same as the previous wiring. The
only difference is when the switch is set to the middle 'coil cut' position Coil B is the active coil.
The Purpose of Selecting Coils
Actually there are two reasons
for selecting a specific humbucker coil.
1) One reason is the sound difference that occurs when
either Coil A or Coil B is chosen. If the humbucker is mounted at the neck position, the sound
difference will be negligible. However, when located at the 'bridge'
position, there is a significant sound change between each coil. As you probably know, when a
humbucker has one of its coils cut, it sounds much brighter.
| |
If you have chosen Coil A, you'll
notice a very bright treble sound that is a drastic change from the rather subdued sound
usually associated with most humbuckers. Selecting Coil B sends the sound even further into the
treble range and yields a bright, almost earsplitting sound. Personally, I'd rather use Coil A for its
fuller and much more pleasing sound. Of course it is your guitar and if you want an over-the-top treble
sound then choose Coil B for the active coil.
And you know the way to 'choose' which coil stays active, right?
Conventional wiring - Coil A is active with coil cut switch 'on'.
Alternate wiring- Coil B is active during coil cut.
 2) The second reason for selecting a particular coil (actually set of coils) is that if it is done in the proper
way, the result is yet another humbucking pickup. (And you thought your guitar only had two humbucking pickups huh?)
2) The second reason for selecting a particular coil (actually set of coils) is that if it is done in the proper
way, the result is yet another humbucking pickup. (And you thought your guitar only had two humbucking pickups huh?)
Think about it. All humbuckers already have an A Coil and a B Coil. So, if you wire the pickups so that
neck pickup Coil A and bridge pickup Coil B are active when both coil cut switches are 'on',
the result will be hum-canceling. (See Diagram A)
Yet another guitar tone results when the pickups are wired so that Coil B at the neck and Coil A at the bridge are the two active pickups during coil cut. (See Diagram B) (As you may have guessed, I like this tone because it doesn't have that extreme treble sound).
Actually, some guitar companies are manufacturing their guitars in just this way. Now, that you know how it is done, you can wire a guitar like this and without the need for buying yet another guitar.
Selecting Coils By Switching
We have used the expression "choosing" a coil but your choice is limited to selecting the active coil before you permanently wire everything. So, if you chose Coil B to be the active coil and later on you realized Coil A might have been a better choice, you would have to rewire the coil cut circuit in order to do this.
 However, there is a way to choose an active coil by switching. Looking at the diagram, if you wire a phase switch along with a coil cut circuit, you will be able to choose the active coil without rewiring anything. When the upper terminals of the phase switch are conducting, Coil A is the active coil. When the bottom phase switch terminals are conducting, the red wire is connecting to ground and the green wire is going to the '+' connection. Because of this, the coil switch now grounds out the red wire and so Coil B becomes the active coil.
Another way to choose active coils by switching is using 2 SPDT switches. To see diagrams for this, please go to page 5 and scroll down ⅔ of the page and read the 'How It Works' section.
Yet another way to choose active coils by switching is wiring a double humbucker guitar for Super Seven Switching™. Of course this is very involved and not something you'd want to do if you just want a coil cut switch and nothing else.
Chrome-Covered Humbuckers With Metal Screws
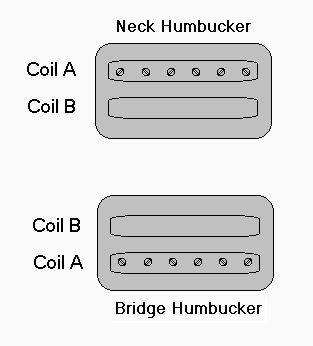 Throughout this entire page we have been referring to the uppermost coil of each humbucker as "A" and the coil beneath that as "B".
In the special case of chrome-covered humbuckers and the way they are mounted on most guitars, the neck humbucker is mounted with the screws nearest the neck and the bridge humbucker is mounted with the screws nearest the bridge.
In this special case, the topmost coil of the neck humbucker is coil "A" and the bottommost coil of the bridge humbucker is also coil "A".
Good luck with the guitar rewiring.
* * * * * * * * * * * * * * * * * *
Click below to go to:
Humbucker Pickup Wire Colors
or
Guitar Wiring Page One
Copyright © 1728 Software Systems
Return To Home Page
|